With the ever growing user demand to go all-digital, wallet passes may be just what you need to bring your customers the convenience they look for. No more downloading new apps, no more opening browsers, and no more log-ins on websites. A simple wallet pass puts your product at the fingertips of your end-users, literally.
They’re also a great way to make your user aware of certain events with local push notifications (iOS only) or trigger the usage of a certain pass at a specific location with the information they need. This article runs you down the steps to create your very own wallet pass. If at any point you get stuck, please feel free to drop Steve or Kamaal a message!
Before we get started
First of all, it’s important to consider the different types of pass types that exist, as different passes fit different companies. Here is an overview of all wallet pass types:
- Boarding pass- transit systems such as train tickets, airline boarding passes, and other types of transit.
- Coupon- special offers, and other discounts.
- Event ticket- gain entry to an event like a concert, a movie, a play, or a sporting event.
- Generic- any pass that doesn’t fit into one of the other more specific styles for example, gym membership cards, coat-check claim tickets, and metro passes that carry a balance.
- Store card- loyalty cards, discount cards, points cards, and gift cards.
More information about the types can be found here.
Prerequisites:
- MacOS – in order to create “Apple Worldwide Developer relations Certification Authority” (WWDR).
- Basic knowledge of command line.

Create everything you’ll need
Create Request Certificate
- Open the keychain app on your macOS machine.
- Click on Keychain access > Certificate assistant > Request a Certificate From a Certificate Authority
- Fill in email address and select save to disk.
- Click on continue and save. (.certSigningRequest)
Create Identifier
- Go to identifiers > create an identifier by clicking on the plus sign.
- Select Pass Type IDs > Click on continue.
- Fill in Description and a unique identifier (pass.com.{{company_name}}.{{project_name}} > Click on register.
- Select your registered pass identifier in list > Click on Create Certificate.
- Fill in your Pass certificate Name > Upload .certSigningRequest certificate from previous step. > Click continue.
Create Certificate
- Download the created certificate (.cer)
- Double click and open in Keychain app > My Certificates > Click on relevant certificate > Export Pass Type ID:… > Save in .p12 format.
- Choose a password (This is your export password).
Create a pkpass by command line:
- Create a pass certificate with openssl and pkcs12 hashing type
- The Path to .p12 certificate (created in the previous step) goes as input.
- The output will be the private key which will be stored in a .pem file
- Replace <import password> with your export password.
openssl pkcs12 -in Certificates.p12 -clcerts -nokeys -out passcertificate.pem -passin pass:<import password> |
After running this command you should see the message “Mac verified OK”
Create a pass key with the following command
- The Path to .p12 certificate (created in the previous step) goes as input.
- Replace <import password> with your export password.
- Replace <key password> with a new key password (This will be your key password).
openssl pkcs12 -in Certificates.p12 -nocerts -out passkey.pem -passin pass:<import password> -passout pass:<key password>
Last steps
Export WWDR certificate
- In the Keychain access app > Certificates tab > Right click on the “Apple Worldwide Developer relations Certification Authority” (a.k.a WWDR)
- Export “Apple ….” > Save as .pem file and rename it WWDR.pem (for convenience).
Define the information in your pass in the pass.json file
More information about the interface can be found here.
- passTypeIdentifier key should have the value of your pass type id (starts with pass.com…)
- teamIdetifier key should be filled in, value can be found in the Apple developer account on the top right corner under your name.
Create your company icon
- Save as icon.png and logo.png
Create your thumbnail
- Save as thumbnail.png
Create a manifest.json file
- Add all file names as keys
- Add hash value for each file by doing the following:
Create a signature by running the following command
- Add the paths to the following files: passcertificate.pem, passkey.pem, WWDR.pem and manifest.json.
openssl smime -binary -sign -certfile WWDR.pem -signer passcertificate.pem -inkey passkey.pem -in manifest.json -out signature -outform DER -passin pass:<key password>
You are now ready to create the wallet pass by running the following command, we are going to create the Generic pass.
- Establish this by zipping all of the following files, including the signature that we’ve previously created.
- Replace <wallet pass name> with the name of the allet pass you wish to create.
zip -r <wallet pass name>.pkpass manifest.json pass.json signature icon.png thumbnail@2x.png icon@2x.png logo.png logo@2x.png thumbnail.png |
Create a pkpass via python:
We’ve created a repo that covers everything you’ll need in order to create a simple pkpass. Make sure that you have already created your certificates.
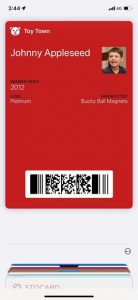
An example of a generic wallet pass:
This generic pass contains some basic information, photo and a barcode. Most common use case is for a business card.
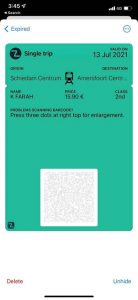
An example of a boarding pass wallet pass:
This boarding pass contains some information about a public transport trip with the Dutch railways. In addition to info about the trip it has an Aztec QR code that will give the passenger access to the train/ports.